 Just as a young Jedi knight is required to build his or her own lightsaber, one of the first
things that an aspiring woodworker is supposed to do is devise a workbench. Some
manage this with specialized tools in the form of a small rectangle of plastic and a
telephone, which results in a completed bench arriving one day in a truck. Most people,
however, feel that it's more sporting to do at least a good part of the work in building
your own bench.
Just as a young Jedi knight is required to build his or her own lightsaber, one of the first
things that an aspiring woodworker is supposed to do is devise a workbench. Some
manage this with specialized tools in the form of a small rectangle of plastic and a
telephone, which results in a completed bench arriving one day in a truck. Most people,
however, feel that it's more sporting to do at least a good part of the work in building
your own bench.The following are a few notes on the questions I dealt with along the way. It's unlikely that you'll agree with all or even most of my decisions, but that's only to be expected. There's lively debate on just about every design detail you can imagine related to benches, and I'm hardly a zealot on any of em.
Why Have a Workbench?
So why even bother with a bench? Or, more specifically, why bother with a bench with vises and so on that is dimensioned and flattened to a very small fraction of an inch? Couldn't you just build woodworking projects on a sheet of plywood on a pair of sawhorses? Or on one of those infamous Workmutts from the local home improvement center?
The answer is that, yes, of course, you can build projects on a sheet of plywood and/or a Workmutt. I concluded that there are several reasons for building a "real" workbench:
1) Its design and vises and so on are optimized for woodworking tasks, so building things is easier.
2) It has a traditional appeal, because workbenches of various designs have been used by woodworkers for centuries.
3) By making the bench as square and flat as possible, you can use its top and sides as reference surfaces while preparing or assembling the components of the project you're working on.
4) It's a good first project to get experience with, and make mistakes on, before going on to "real" projects such as furniture.
Many experienced woodworkers recommend that you lash together a minimal bench to use for the time being before eventually building your "dream" bench. I actually built two bench/tables while I was marshalling my energies to build my workbench. The first was a small workbench for my 5-year-old son based on a plywood top with a small Pony face vise attached. The second was a general utility table consisting of a plywood top sitting on 2x4 legs. I used the latter as my stand-in bench while I was building my workbench, and I still use it around the shop for many purposes (finishing, outfeed table, etc.).
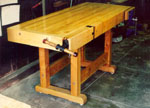
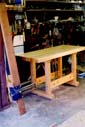
The Basic Design
Just about every woodworker who is thinking about building a bench ends up looking at a book called The Workbench Book by Scott Landis. I dutifully got a copy and went through it. At first I was attracted to the minimalist idea of the Ian Kirby bench -- it's really just a plain slab on a simple base, one front vise and a couple of bench stops. It was while researching the possible sizes of the front vise (a Record 52-1/2D vs. a 53E) that John Gunterman convinced me to buy one of Lee Valley's discontinued sliding tail vises. I couldn't stick with the simple Kirby design, because the tail vise required a more elaborate front skirt, dog holes, etc. I therefore switched to a design closer to the Michael Fortune bench in the Landis book, described therein as "a modern hybrid" bench.
How Tall?
There are different theories on how tall a workbench should be. The classic thinking is that it should be as tall as your knuckles if you stand with your arms at your side. Others, however, argue that a taller bench is more comfortable. I imagine it depends on exactly what kind of operations you do the most of. For myself, I adopted the height of the table of a certain tailed apprentice in my shop as the basic "reference height" for table and bench surfaces. The idea here is that if I was wrestling with something big like a full sheet of plywood, or needed a makeshift outfeed table for one of those electron-manglers around the shop, I could use the bench or any one of a number of other surfaces. I think this put the workbench height right around 34-1/2".
The Base
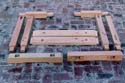
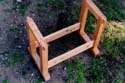 Since this project was an experiment, and one of my first woodworking projects, I didn't
want to sink a lot of money into a premium wood for the base. I just made it out of
construction-grade Douglas fir from the local
home improvement center with the orange and
white sign. The design, however, was virtually identical to that of the base for the
Fortune bench in the Landis book, with four legs, two top bearers, two strechers, and two
feet. I just used bolts from the aforementioned home center instead of any fancy
hardware to connect the stretchers to the legs. Although not as aesthetic as a nice
hardwood, the base turned out to be surprisingly stable.
Since this project was an experiment, and one of my first woodworking projects, I didn't
want to sink a lot of money into a premium wood for the base. I just made it out of
construction-grade Douglas fir from the local
home improvement center with the orange and
white sign. The design, however, was virtually identical to that of the base for the
Fortune bench in the Landis book, with four legs, two top bearers, two strechers, and two
feet. I just used bolts from the aforementioned home center instead of any fancy
hardware to connect the stretchers to the legs. Although not as aesthetic as a nice
hardwood, the base turned out to be surprisingly stable.One small innovation was to add levelers to each of the legs so that I could fine-tune the height of the bench. Originally I thought these looked kind of funny -- all that weight perched on four slim bolts. But I got a nice set of heavy-duty levelers from Woodworker's Supply (I believe I've seen that Lee Valley has since started carrying them, although they didn't at the time).
The Wooden Slab -- Make or Buy?
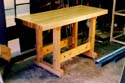 Dimensioning and gluing up your own benchtop slab is supposed to be good for you.
Everyone who I talked to who had built a bench, however, said it was the one part of the
process they would gladly skip if they were doing it again.
Dimensioning and gluing up your own benchtop slab is supposed to be good for you.
Everyone who I talked to who had built a bench, however, said it was the one part of the
process they would gladly skip if they were doing it again.My own decision was dictated by economics. I couldn't find a decent hardwood at a cheap enough price locally to make it worth my time to glue up my own slab. (I had decided I wanted to go for a hardwood like maple or beech rather than a softwood, which some woodworkers advocate). A lot of people say you can save money by buying wood from a torn-up bowling alley, but I couldn't find any deals on that locally either. (I imagine this opportunity will be history when, eventually, all of the bowling alleys and miniature golf courses of America are converted to coffeehouses.) So I decided to buy a mail-order slab -- specifically, a 24" by 60" by 2-3/4" jobbie from Lee Valley.

 Speaking of which, that's another chief design question -- the bench's dimensions. A lot
of people like a nice, long bench, but I've got a small shop (the whole thing being on the
order of 12 by 16 feet). With three inches of front skirt on one side and a couple of
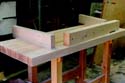
inches of end cap on each end, the final dimensions ended up at 27 by 64 inches.
Speaking of which, that's another chief design question -- the bench's dimensions. A lot
of people like a nice, long bench, but I've got a small shop (the whole thing being on the
order of 12 by 16 feet). With three inches of front skirt on one side and a couple of
inches of end cap on each end, the final dimensions ended up at 27 by 64 inches.A Tool Well?
I know a lot of people can't imagine doing without them, but a tool well seemed to me to be a good place to collect shavings and chips -- and a lot of extra work. So I just ended up with a plain, flat surface. I do find I scatter a lot of tools across it while I work.
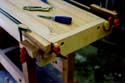
Dogholes: Round or Square?
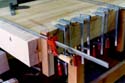
One of the more surrealistic debates on Usenet's rec.woodworking group occurred a couple of years back when there was a pitched discussion of the merits of round vs. square dogholes. Purported engineering aspects aside, a lot of people like square dogholes because they are more traditional. I was inclined toward round dogholes because (a) they were much easier to cut, and (b) the tail vise I was installing called for em anyway. So that's the way I went.
A corollary raging issue is the question of how many dogholes to install, and in what kind of pattern. I haven't made my mind up on this yet, even though the bench is otherwise done for all intents and purposes. It has a line of dogholes running down the front skirt (with holes on the top, bottom and outer edge of the skirt) for use in conjunction with the tail vise. If I decide I need more, I guess I can get ready to bore em.
A Bench for Lefties -- How Gauche!
Hi, my name is Frank and I'm a lefthanded person. I therefore decided to swap the usual layout of the bench from left to right and vice versa, so that the face vise would be on the near right corner as you face the bench and the tail vise would be on the left. Some righthanded people claim it shouldn't make any difference and that lefthanded people should calm down and use righthanded benches. But if it doesn't make any difference, why is the usual righthanded configuration so set in stone? Handedness of the bench seemed to me considerably less important than, say, how a guitar is strung, but I decided to go leftie for the heck of it.
The Vises
 There are a lot of good vises out there, but I really liked the look of the
Record vises so I
went with one of them. I was momentarily tempted to join the cult of the Emmert
pattern-maker's vise, but I was looking at maybe five bills to get a decent old Emmert in
usable condition. Since then, Woodcraft has
started selling a Taiwanese-made Emmert clone at less than a half of that cost. But I
stuck with a Record.
There are a lot of good vises out there, but I really liked the look of the
Record vises so I
went with one of them. I was momentarily tempted to join the cult of the Emmert
pattern-maker's vise, but I was looking at maybe five bills to get a decent old Emmert in
usable condition. Since then, Woodcraft has
started selling a Taiwanese-made Emmert clone at less than a half of that cost. But I
stuck with a Record.I did ask around a fair amount regarding the merits of the midsized Record vise (their 52-1/2D) and the biggest model (the 53E). I found that opinion divided evenly between those who (a) thought the 52-1/2D was better proportioned for a bench of the size I was contemplating, and those who (b) think you should always get the biggest honking vise you can strap onto your bench. I threw in my lot with the former group, and am quite happy with the 52-1/2D.
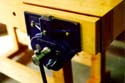
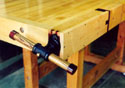 There are several possible ways to mount a vise like this. I cut a long mortise into the
bench skirt so that the fixed jaw of the vise was buried within the skirt and the front of
the skirt effectively became the fixed jaw. I added leather to both jaws (as well as to
those on the sliding tail vise).
There are several possible ways to mount a vise like this. I cut a long mortise into the
bench skirt so that the fixed jaw of the vise was buried within the skirt and the front of
the skirt effectively became the fixed jaw. I added leather to both jaws (as well as to
those on the sliding tail vise).Scrape or Sand?
Yet another point of controversy in the arcana of workbenches. Purists say that you must weigh carefully whether you will ever put a sheet of sandpaper to your benchtop, for if you do it will clog the benchtop's pores with grit and render it impossible to ever plane. I dunno, but I'm thinking that maybe that's an extreme position. I started off handplaning and scraping the benchtop, but I had a lot of factory-applied sealer to take off before I could refinish it and I ended up using just about every technology at hand, including sandpaper. When I get around to reflattening the top in a couple of years maybe I will face the dreaded consequences of that decision.
And Finally -- Finishing Up
There's lively debate as well on what if any finish to apply to the bench. I ran across an old article about Frank Klausz wherein he advocated a commercial tung-oil-based product called Waterlox, followed by a paste wax. Since I'd seen one of Frank's benches at a woodworking show and agreed that it was very shiny, I followed his lead. Took about a quart and a half of the stuff in all.
While the bench was in progress I was in the habit of applying good old Johnson's Wax to the benchtop to keep it shiny. As I was finishing the tail vise around the winter holidays 1999-2000, I ran across Stuart Altschuler's cover story in the February 2000 issue of Fine Woodworking on make-your-own paste waxes. Since I had a supply of beeswax, I found a local supplier for carnauba and candelilla waxes, stocked up on turpentine and tried out Altschuler's formula for an extra hard and shiny finish. (1 TBL each of carnauba and candelilla; 2-1/2 TBL of beeswax; and 6-3/4 oz of turpentine).
So What Else?
There's tons of other information on making workbenches out there. I used to have a link here to a web page that had a roundup of other pages about woodworking benches, but it since seems to have gone caput, so you might be best off to do a search with your favorite online engine. Good luck with your bench!
On to The Sliding Tail Vise
Back to Le Bench Top Page